Elaine Gordon
Ah, summer! The sun shines brightly, the days are long, and fresh berries burst with juicy sweetness. If you’re like me, you’ve probably found yourself with more berries than you know what to do with.
Well, my friends, it’s time to roll up those sleeves and make a delightful 20-minute berry jam. But before we dive in, let’s talk pairings because a jar of homemade jam opens up a world of delicious opportunities.
What Pairs Well with Berry Jam?
Berry jam is a culinary chameleon. You can slather it on toast for breakfast, smother it over pancakes for a sweet brunch treat, or even use it as a filling in desserts like pastries or cakes. But wait, there’s more:
Cheese Board Topping: It elevates a cheese board instantly. Imagine a slab of creamy brie with a dollop of berry jam—pure bliss!
Yogurt or Oatmeal Mix-In: Stir it into your morning yogurt or oatmeal for a sweet start to the day. The tartness of the berries balanced with the creamy textures adds a nice flair.
Glaze for Meat: Yes, you read that right! Use it as a glaze for grilled chicken or pork. The sweetness plays beautifully against smoky flavors.

You’ll Also Like These Recipes
I’ve always cherished homemade preserves. When I was young, my grandmother would lead me down those magical aisles of the local farmers’ market, filling her basket with colorful berries. The thrill of arriving home to a bubbling pot on the stove continues to inspire today’s quick and easy berry jam recipe.
This 20-minute berry jam not only closes the gap between you and a perfectly balanced jar of sweetness but also gives you an instant, fresh taste of summer all year round. Using just a handful of ingredients and minimal time, you’ll have a treat you can be proud to share—or hoard all to yourself!
What is 20-Minute Berry Jam?
This berry jam is all about speed and flavor. It’s a quick way to transform fresh, ripe berries into a fruity spread that pairs well with just about anything. Think of it as your go-to recipe when those berries start getting a bit too soft.
Instead of letting them waste away, you’ll create something magical and sweet in about 20 minutes. Plus, you can adjust the sweetness and flavor to your liking, which is a nice perk.
Why This Recipe Works
Speedy Preparation
Twenty minutes from start to finish is not a myth. You can whip this jam together faster than you can make a pot of coffee. With few ingredients and a simple method, your jam will be ready before you can say “berrylicious.”
Minimal Ingredients
You only need a handful of staples: berries, sugar, lemon juice, and a hint of vanilla or spice if you’re feeling adventurous. Each ingredient plays a crucial role. The sugar preserves while enhancing the sweet, tangy flavors of the berries, while lemon juice adds necessary acidity to balance sweetness.
Adaptability
This jam is a blank canvas. While this recipe concentrates on mixed berries, you can easily throw in whatever flavor combinations tickle your fancy. Love blackberries? Go for it. Prefer strawberries alone? They’ll shine here too.
Health Benefits
Fresh berries are packed with vitamins, antioxidants, and fiber. This recipe keeps it relatively simple without preservatives, meaning you get all the health benefits of berries without added chemicals. Plus, you control the sugar content!
Ingredients You’ll Need to Make This Dish
To embark on your jam-making journey, gather these staples:
- 2 cups granulated sugar
- 6 cups mixed fresh berries
- 2 tablespoons bottled lemon juice
- 1/2 teaspoon vanilla extract (optional)
- 1/4 teaspoon ground cinnamon (optional)

How to Make This 20-Minute Berry Jam
Step 1: Prepare the Berries
Start by washing your fresh berries thoroughly. If you’re using strawberries, hull and slice them into smaller pieces for easy mashing. For raspberries, blueberries, and blackberries, they’re good to go as is.
Step 2: Combine Ingredients
In a medium saucepan over medium heat, combine 6 cups of berries, 2 cups of granulated sugar, and 2 tablespoons of lemon juice. Stir gently until the sugar begins to dissolve, and the berries release their juices—this usually takes about 2-3 minutes.
Step 3: Bring to a Boil
Increase the heat and bring the mixture to a gentle boil. You’ll want to keep stirring frequently to prevent sticking or burning. Once it reaches a boil, let it bubble away for about 10-15 minutes. You’re looking for that perfect jammy texture—keep an eye on it!
Step 4: Test the Consistency
After about 10 minutes, you should check the consistency. Take a spoonful of jam and let it cool slightly. Run your finger through it; if it holds its shape without running back together, you’ve hit the jackpot!
Step 5: Add Flavors
At this point, if you’re using vanilla extract and cinnamon, stir them in. Give everything a good mix to incorporate those delightful layers of flavor.
Step 6: Jar it Up
Once the jam has reached your desired consistency, pour it into clean, sterilized jars. Leave a little space at the top, and seal them tightly. Let them cool completely before storing them in the fridge.
Tips & Tricks
Use Ripe Berries: The sweeter, the better! Ripe berries yield a more flavorful jam.
Adjust the Sugar: If the berries are particularly sweet, reduce the sugar. The jam will still set just fine.
Check for Gelling: Every berry behaves differently, so feel free to experiment with pectin if you’re unsure about the texture.
Feel Free to Experiment: Mix and match different berries. You can create a unique blend every time!
Store Properly: Jars can last in the fridge for about two weeks—but trust me, they won’t last that long!
Nutrition Information
A typical serving (1 tablespoon) of homemade berry jam contains:
- Calories: 50
- Total Fat: 0g
- Carbohydrates: 13g
- Sugars: 12g
- Protein: 0g
This can vary based on the types and amounts of berries used. Always feel free to adjust the sugar content, especially if you’re watching your intake!
How Do You Store the Leftovers?
Once you’ve jarred up this deliciousness, store the jam in your refrigerator. Properly sealed, it can last up to two weeks. If you want to keep it longer, consider freezing it in suitable jars or containers. Just make sure to leave some room at the top, as liquids expand when frozen.
What Sides Would Complement 20-Minute Berry Jam?
Now, let’s talk about how to enjoy this gem:
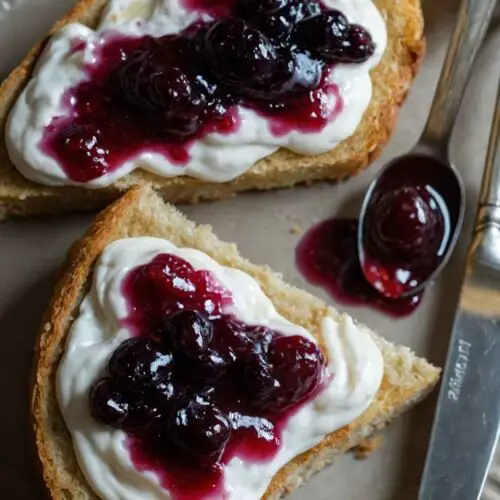
Toast or English Muffins
Nothing beats the classic combination of fresh bread and berry jam. Toast your favorite bread or pop an English muffin in the toaster. Spread your jam generously, letting it melt slightly into the warm bread.
Pancakes and Waffles
Elevate your breakfast game. Pour this jam over fluffy pancakes or waffles for an impressive brunch that will make you look like a superstar in the kitchen.
Cheese Board
Add your jam to a cheese platter. It pairs beautifully with cream cheese or goat cheese, adding a sweet and tart contrast that will have your guests raving.

What Alternatives Can You Use for the Ingredients If They Are Not Present In Your Kitchen?
Not every pantry is filled with the same items, and that’s perfectly fine! Here are some alternatives you can use.
Sweeteners
If you don’t have granulated sugar, consider honey or maple syrup. Keep in mind that the texture may change slightly, but the flavor will be just as delightful.
Citrus Juice
No lemon juice? No problem! Lime juice could offer a zesty twist. You can experiment with orange juice, too, which gives a unique flavor but may require an adjustment in sweetness.
Other Berries
Stuck with just one type of berry? Don’t worry. This recipe accommodates a wide range of berries. Even dried ones, if rehydrated, could work in a pinch!
Spices and Flavor Add-ins
If vanilla extract is out of reach, consider almond extract or even a hint of ginger for a unique twist. Mix it up with what you have; your creativity is the true secret ingredient.
20-Minute Berry Jam
Equipment
- Saucepan, Cup
Ingredients
- 2 cups granulated sugar
- 6 cups mixed fresh berries
- 2 tablespoons bottled lemon juice
- 1/2 teaspoon vanilla extract optional
- 1/4 teaspoon ground cinnamon optional
Instructions
Step 1: Prepare the Berries
- Start by washing your fresh berries thoroughly. If you’re using strawberries, hull and slice them into smaller pieces for easy mashing. For raspberries, blueberries, and blackberries, they’re good to go as is.
Step 2: Combine Ingredients
- In a medium saucepan over medium heat, combine 6 cups of berries, 2 cups of granulated sugar, and 2 tablespoons of lemon juice. Stir gently until the sugar begins to dissolve, and the berries release their juices—this usually takes about 2-3 minutes.
Step 3: Bring to a Boil
- Increase the heat and bring the mixture to a gentle boil. You’ll want to keep stirring frequently to prevent sticking or burning. Once it reaches a boil, let it bubble away for about 10-15 minutes. You’re looking for that perfect jammy texture—keep an eye on it!
Step 4: Test the Consistency
- After about 10 minutes, you should check the consistency. Take a spoonful of jam and let it cool slightly. Run your finger through it; if it holds its shape without running back together, you’ve hit the jackpot!
Step 5: Add Flavors
- At this point, if you’re using vanilla extract and cinnamon, stir them in. Give everything a good mix to incorporate those delightful layers of flavor.
Step 6: Jar it Up
- Once the jam has reached your desired consistency, pour it into clean, sterilized jars. Leave a little space at the top, and seal them tightly. Let them cool completely before storing them in the fridge.
Notes
Nutrition
Frequently Asked Questions
Can I use frozen berries for this jam?
Absolutely! Frozen berries work well as long as you thaw them. They might release more liquid, so adjust cooking time accordingly.
How can I tell when my jam is fully cooked?
Check for the consistency by placing a spoonful on a plate to cool. It should wrinkle when pushed with your finger and not run back together.
Can I can this jam for longer storage?
Yes, you can process jars in a water bath canner for longer shelf life. Ensure they are sealed correctly.
What’s the best way to serve berry jam?
Serve it on toast, pancakes, yogurt, or cheese platters. The options are endless for enjoying this treat!
Can I reduce the sugar further without compromising taste?
You can! Start by reducing it by a quarter and taste as you go. Note that the cooking time may vary.
Is it gluten-free?
Yes! This jam is naturally gluten-free as it doesn’t contain any grains.
Conclusion
In under 20 minutes, you’ve created something special. This berry jam encapsulates the sweet essence of summer, ready to elevate your breakfast, brunch, or snack time. Not only is it easy to whip up, but it also allows you to play with flavors and adjust the sweetness to your preference.
So next time you come across a bounty of berries, remember this recipe and set aside some time to create your own delicious jam. Your taste buds will thank you, and you’ll impress everyone who gets a taste. Happy jam-making, and may your summer be as sweet as your latest batch!