 Elaine Gordon
When summer hits, there’s nothing quite like firing up the grill and enjoying tacos with friends and family. Picture this: a sun-soaked backyard, laughter mingling with the sizzle of fresh ground beef, and a spread of toppings ready to customize every taco to perfection.
Those flavors! Today, I’m sharing my favorite American taco recipe that brings that backyard joy right into your kitchen. Trust me, just one bite, and you’ll be hooked.

Tacos are a classic favorite in American homes. Their versatility allows for endless variations, from the traditional beef to vegetarian options packed with delicious veggies. But there’s something about homemade tacos that elevates the experience.
This recipe is all about creating that perfect crunch, a satisfying filling, and a pop of flavor that tickles your taste buds. Whether you’re hosting a casual dinner or looking for a fun weeknight meal, these tacos are as delightful as they are simple to make.
You Might Like These Recipes!
Dilled Cucumber Tomato Salad Recipe
Mediterranean Orzo Salad Recipe
What is American Taco Recipe?
At its core, the American taco is a soft or crispy tortilla filled with a seasoned mixture, typically featuring ground beef or chicken, fresh veggies, and an array of toppings. Unlike traditional tacos that often spotlight specific regional ingredients, the American version embraces a myriad of flavors and textures, creating a beloved and accessible dish.
What Does It Taste Like?
Imagine sinking your teeth into a taco filled with juicy, well-spiced meat that dances with bold flavors. The crunch of the tortilla adds a satisfying texture, while the freshness of veggies like lettuce and tomatoes introduces a refreshing contrast. The added tang from jalapeños and warmth from spices creates a delicious balance. Each bite is an explosion of flavor that leaves you wanting more.
Why This Recipe Works?
This recipe stands out for its straightforwardness and the delightful combination of ingredients. The homemade taco shells give that crispy crunch you crave, while the seasoned beef filling takes just minutes to prepare. Plus, customizing your taco is so easy with fresh toppings, making this dish perfect for both picky eaters and adventurous food lovers alike.
Ingredients

To make these incredible tacos, you’ll need the following:
– 3/4 cup peanut oil
– 12 (6-inch) corn tortillas (yellow or white depending on your preference)
– Kosher salt, for seasoning and 1 teaspoon for beef
– 1 medium onion, finely chopped
– 16 ounces ground beef (or ground turkey for a leaner option)
– 2 cloves garlic, minced
– 2 tablespoons chili powder
– 1 tablespoon ground cumin
– 2 teaspoons cornstarch
– 2 teaspoons kosher salt
– 1 1/2 teaspoons hot smoked paprika
– 1 teaspoon ground coriander
– 1/2 teaspoon cayenne pepper
– 2/3 cup low-sodium beef broth
– 6 ounces crumbled feta cheese (for a flavor boost!)
– 12 pickled jalapeño slices
– 1 cup shredded iceberg lettuce (optional)
– 1 large tomato, seeded and chopped (optional)
– 1/2 cup fresh cilantro leaves (optional)
Ingredients From : foodnetwork.com/recipes
How to Make American Taco Recipe?
Now that we have our ingredients, let’s get to the good part: making these tacos! It’s a straightforward process that combines crispy taco shells with a flavorful beef mixture. Here’s how you do it, step-by-step:
Step-by-step Directions
Step 1: Create Your Taco Shell Mold

Start by fashioning a taco shell mold from aluminum foil. Roll out a piece of foil and fold it over every 10 inches until you have a thick square. Fold this square in half, crimp the edges to create a shape, and form it into a hollow, narrow tube. This mold will help shape your tortillas into the perfect taco shell!
Step 2: Preheat Oven

Fire up your oven to 250 degrees F. This low heat will keep your taco shells warm while you prepare the filling.
Step 3: Heat the Oil

In a 12-inch cast iron skillet, heat the peanut oil over medium heat until it reaches 350 degrees F. You can check this using a deep-fry thermometer. This step is essential for getting those nice, crispy tortilla shells.
Step 4: Prepare the Taco Shells

Take one tortilla and mold it around your aluminum foil mold to create that taco shape. With tongs, hold the tortilla against the mold and gently place the bottom half into the hot oil. Let it fry for 20 seconds, then lower one side into the oil for 30 seconds. Flip it over and fry for an additional 30 seconds until golden brown. Once done, place your taco shell on a cooling rack over a newspaper-lined half-sheet pan and cool for 30 seconds before gently removing the mold. Don’t forget to sprinkle a pinch of kosher salt on top!
Step 5: Fry the Remaining Tortillas
Repeat the frying process for the remaining tortillas, keeping them warm in the oven while you prepare the beef filling.
Step 6: Cook the Meat Filling
Drain excess oil from the skillet, keeping just 2 tablespoons in. Return the skillet to medium heat and add the chopped onion. Cook until it’s softened and lightly browned. Then, add in your ground beef, garlic, and a teaspoon of salt. Stir to break up the meat while it cooks, about 3-4 minutes until browned.
Step 7: Add Taco Potion
Stir in your taco seasoning mix and the beef broth. Let the mixture simmer uncovered for 2-3 minutes until slightly thickened. This ensures the beef is packed with flavor and loaded with spices.
Step 8: Assemble the Tacos
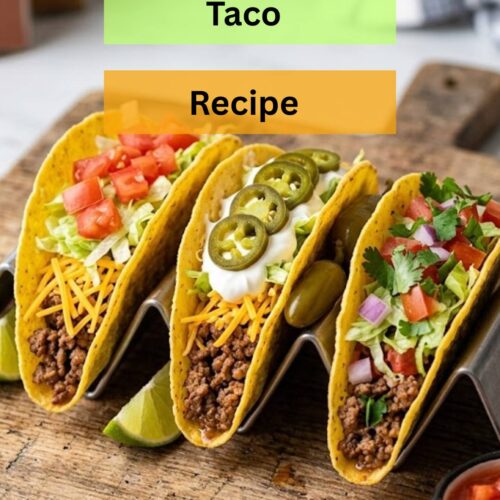
Now comes the fun part! Fill each crispy taco shell with the hearty beef mixture. Top with feta cheese, pickled jalapeños, shredded lettuce, fresh tomatoes, and cilantro. Serve those beauties immediately and watch them disappear!
Notes
– Watch the oil temperature: Keeping the right oil temperature is crucial for crispy taco shells. Too cool and they’ll absorb too much oil; too hot and they’ll burn.
– Experiment with fillings: Feel free to swap out the beef for grilled chicken or veggies.
– Adjust spice levels: If you prefer a milder taco, reduce the jalapeños or skip the cayenne pepper.
– Make ahead: The beef filling can be prepared ahead of time and kept in the fridge. Just reheat when you’re ready to assemble.
– Don’t skip the toppings: Fresh toppings add a whole new layer of flavor and crunch. Mix and match to your heart’s content!
Storage Tips
Store any leftover taco filling in an airtight container in the fridge for up to 3 days. The taco shells, however, are best eaten fresh. If you must store them, wrap them tightly in foil and keep them at room temperature for a day. Re-crisp them in the oven when ready to serve.
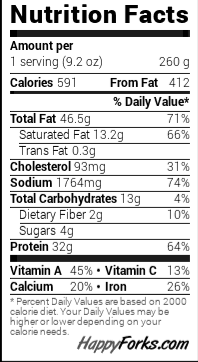
Nutrition Information
A serving of these tacos will provide you with around 400 calories, with a good balance of protein from the beef and healthy fats from the oil. Remember that calorie content will vary based on portion sizes and choice of toppings.
Sides for American Taco Recipe
– Guacamole: Creamy and rich, it pairs beautifully with the tacos, adding a smooth texture and flavor.
– Mexican Rice: Fluffy rice seasoned with herbs and spices complements the flavors of the taco filling.
– Refried Beans: These offer a hearty addition that rounds out the meal and adds fiber.
– Corn Salsa: Sweet corn mixed with tomatoes and cilantro provides a refreshing burst of flavor.
– Chips and Salsa: A classic combination that serves as a crunchy side for dipping between bites of your taco.
What are some alternative choices to the ingredients in case they are not in your pantry?
– Ground Beef Alternatives: Use ground turkey or chicken instead for a leaner option.
– Tortilla Options: Corn tortillas can be swapped for whole wheat or flour tortillas to cater to dietary preferences.
– Feta Substitute: If you prefer a different cheese, crumbled queso blanco or shredded cheddar works nicely too.
– Oil Alternatives: Canola or vegetable oil can replace peanut oil if you’re looking for a different flavor or gluten-free option.
– Broth Options: For a vegetarian option, substitute beef broth with vegetable broth.
American Taco Recipe
Equipment
- Cast iron skillet
- aluminum foil
- deep-fry thermometer
- tongs
- cooling rack
- mixing jar
Ingredients
- To make these incredible tacos you’ll need the following:
- – 3/4 cup peanut oil
- – 12 6-inch corn tortillas (yellow or white depending on your preference)
- – Kosher salt for seasoning and 1 teaspoon for beef
- – 1 medium onion finely chopped
- – 16 ounces ground beef or ground turkey for a leaner option
- – 2 cloves garlic minced
- – 2 tablespoons chili powder
- – 1 tablespoon ground cumin
- – 2 teaspoons cornstarch
- – 2 teaspoons kosher salt
- – 1 1/2 teaspoons hot smoked paprika
- – 1 teaspoon ground coriander
- – 1/2 teaspoon cayenne pepper
- – 2/3 cup low-sodium beef broth
- – 6 ounces crumbled feta cheese for a flavor boost!
- – 12 pickled jalapeño slices
- – 1 cup shredded iceberg lettuce optional
- – 1 large tomato seeded and chopped (optional)
- – 1/2 cup fresh cilantro leaves optional
Instructions
Step 1: Create Your Taco Shell Mold
- Start by fashioning a taco shell mold from aluminum foil. Roll out a piece of foil and fold it over every 10 inches until you have a thick square. Fold this square in half, crimp the edges to create a shape, and form it into a hollow, narrow tube. This mold will help shape your tortillas into the perfect taco shell!
Step 2: Preheat Oven
- Fire up your oven to 250 degrees F. This low heat will keep your taco shells warm while you prepare the filling.
Step 3: Heat the Oil
- In a 12-inch cast iron skillet, heat the peanut oil over medium heat until it reaches 350 degrees F. You can check this using a deep-fry thermometer. This step is essential for getting those nice, crispy tortilla shells.
Step 4: Prepare the Taco Shells
- Take one tortilla and mold it around your aluminum foil mold to create that taco shape. With tongs, hold the tortilla against the mold and gently place the bottom half into the hot oil. Let it fry for 20 seconds, then lower one side into the oil for 30 seconds. Flip it over and fry for an additional 30 seconds until golden brown. Once done, place your taco shell on a cooling rack over a newspaper-lined half-sheet pan and cool for 30 seconds before gently removing the mold. Don’t forget to sprinkle a pinch of kosher salt on top!
Step 5: Fry the Remaining Tortillas
- Repeat the frying process for the remaining tortillas, keeping them warm in the oven while you prepare the beef filling.
Step 6: Cook the Meat Filling
- Drain excess oil from the skillet, keeping just 2 tablespoons in. Return the skillet to medium heat and add the chopped onion. Cook until it’s softened and lightly browned. Then, add in your ground beef, garlic, and a teaspoon of salt. Stir to break up the meat while it cooks, about 3-4 minutes until browned.
Step 7: Add Taco Potion
- Stir in your taco seasoning mix and the beef broth. Let the mixture simmer uncovered for 2-3 minutes until slightly thickened. This ensures the beef is packed with flavor and loaded with spices.
Step 8: Assemble the Tacos
- Now comes the fun part! Fill each crispy taco shell with the hearty beef mixture. Top with feta cheese, pickled jalapeños, shredded lettuce, fresh tomatoes, and cilantro. Serve those beauties immediately and watch them disappear!
Notes
FAQs
1. Can I make the taco filling ahead of time?
Absolutely! The filling can be cooked and stored in the refrigerator for up to 3 days. Just warm it up when you’re ready to serve.
2. Can I freeze the tacos?
While the filling can be frozen, the taco shells will not hold up well after freezing. Consider freezing the filling alone.
3. What can I substitute if I’m allergic to peanuts?
If you have a peanut allergy, using a neutral oil like sunflower or canola oil will work perfectly for frying without needing to change flavors.
4. How can I make these tacos vegetarian?
You could use black beans, lentils, or a mix of your favorite veggies as the filling. Season them similarly to keep the flavor profile intact.
5. Is there a way to make this recipe more kid-friendly?
Sure! You can tone down the spice by using mild salsa instead of jalapeños and consider adding cheese as a primary topping. Kids may love customizing their own!
Conclusion
This American taco recipe is not just about feeding your hunger; it’s an experience. It’s about creating a meal that brings joy, laughter, and connection. With easy steps and simple ingredients, you can whip up a batch that delights both family and friends. So, grab your tortillas, fire up that skillet, and let’s taco ’bout a great time!
Enjoy every bite, and may your kitchen always be filled with laughter and good food!