When it comes to tuna melts, there’s a lot more to the dish than just the sandwich itself. You can elevate your meal experience by pairing it with some delightful sides. Picture this: a crispy side salad made with fresh greens and a tangy vinaigrette.
Or perhaps you might prefer crispy oven-baked fries that carry a hint of seasoning to complement the rich flavors of the melt. Maybe you’re in the mood for a zesty pickle on the side, providing that refreshing crunch and acidity to balance out everything.
Regardless of your choice, these pairings can enhance your enjoyment of the tuna melt.

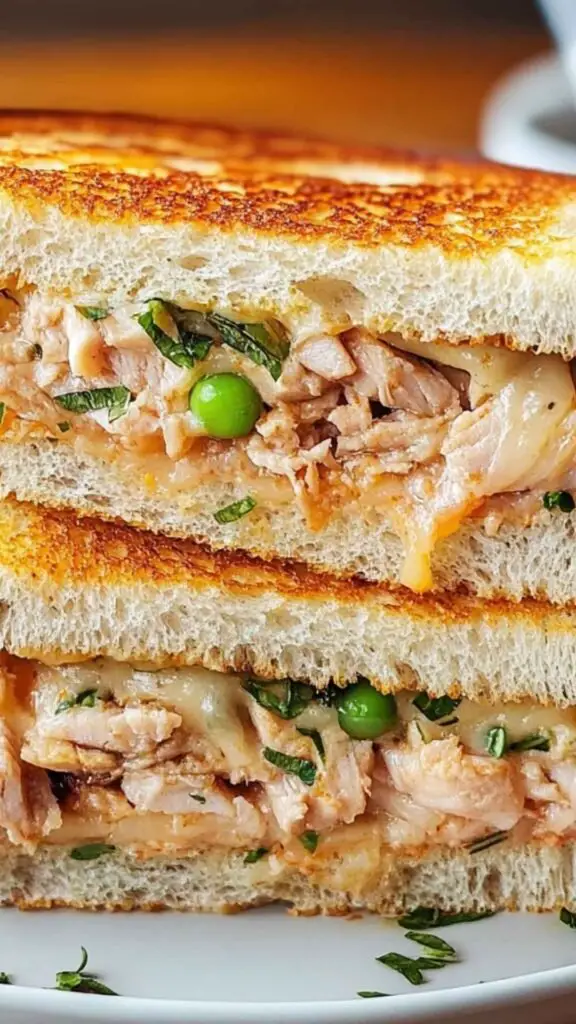
Ah, the tuna melt! This sandwich is an old-school classic. It’s simple yet satisfying, a comfort food that has found its way into countless lunchboxes and diner menus.
The crunch of toasted bread, the creaminess of the filling, and the melty cheese combine to create a delightful experience.
You can whip it up in no time, making it a go-to meal for busy weeknights. As a food enthusiast and registered dietitian, I have crafted this recipe to be delicious and nourishing. So, roll up your sleeves and let’s dive into this delicious journey together!
Why This Recipe Works?
1. Flavorful Balance
The combination of tuna, creamy mayonnaise, and a splash of lemon juice creates a harmony of rich and zesty flavors. This balance makes each bite exciting.
2. Texture Variety
The contrast between the toasty bread and creamy tuna filling creates a satisfying eating experience. Add-ins like crunchy celery and pickles provide delightful texture that keeps each bite interesting.
3. Customizable Ingredients
This recipe is adaptable. You can swap out ingredients based on your preferences or what you have on hand. This makes it easy to experiment and find your perfect combination.
4. Quick Preparation
With just a few simple steps, you can have a delicious meal on the table in less than thirty minutes. This ease means you can satisfy those hunger pangs without a long wait.
How Does It Taste?
Imagine biting into the warm, toasty sandwich. You first notice the hearty flavor of the tuna mixed with mayo and Dijon. A zing from the lemon juice dances on your palate.
Next comes the creaminess of the melted cheddar, and finally, there’s that satisfying crunch from the fresh veggies mixed in. It’s a medley of flavors and textures that somehow works in perfect harmony. This is why the tuna melt has so many fans.
What Sets This Recipe Apart from Other Tuna Melt Variations?
This tuna melt recipe stands out because of its thoughtful ingredient choices. Many recipes skimp on flavor, using bland bread or generic seasonings.
Here, every ingredient—from high-quality tuna in olive oil to the sharp cheddar cheese—is carefully chosen to deliver exceptional taste.
Unlike standard recipes, the inclusion of fresh herbs and a touch of chili flakes elevates this dish. It transforms a simple sandwich into a culinary delight.
You’ll Also Like The Following Recipe
The Ingredients
Here’s what you’ll need:
– 2 (6-oz.) cans tuna in olive oil, drained
– 1/3 cup creamy mayonnaise
– 1 Tbsp. Dijon mustard
– Juice from 1/2 fresh lemon
– 1/2 tsp. red chili flakes
– 1 stalk celery, finely chopped
– 2 dill pickles, minced
– 1/4 cup finely diced red onion
– 2 Tbsp. fresh parsley, chopped
– Sea salt, to taste
– Freshly cracked black pepper
– 8 slices of hearty bread, such as sourdough
– 4 Tbsp. unsalted butter
– 1 ripe tomato, sliced
– 8 slices sharp cheddar cheese
– 1 tbsp. capers, chopped

Instructions
Step 1: Prepare the Tuna Mixture
In a medium bowl, combine the drained tuna, mayonnaise, Dijon mustard, lemon juice, red chili flakes, celery, dill pickles, red onion, and parsley.
Mix thoroughly until all ingredients are well combined. Taste the mixture and adjust seasoning with salt and pepper.
Step 2: Assemble the Sandwiches
Lay out half of the bread slices on a clean surface. Spread a generous amount of the tuna mixture on each slice. Top with sliced tomatoes and cheddar cheese. Place the remaining bread slices on top, creating a sandwich.
Step 3: Butter the Bread
Spread a thin layer of butter on the outside of each sandwich. This will help create that amazing golden crust.
Step 4: Cook the Sandwiches
Preheat a skillet over medium heat. Once hot, carefully place the sandwiches in the skillet. Cook for about 3-4 minutes on each side, or until the bread is golden brown and the cheese has melted. Adjust heating as necessary to prevent burning.
Step 5: Serve
Once cooked, remove the sandwiches from the skillet. Let them cool slightly before slicing in half. Serve warm, and enjoy!
Notes
- Use Fresh Ingredients: Fresh tuna and high-quality mayonnaise will significantly enhance the flavor.
- Experiment with Cheese: Feel free to try other cheeses like Swiss or pepper jack for a twist.
- Add More Veggies: Spinach or arugula can add more nutrition and crunch.
- Spice Control: Adjust chili flakes or use hot sauce for those who prefer it spicier.
- Serving Size: This recipe makes about four sandwiches, a great meal for family or friends.
Nutrition Information
Tuna melt nutrition facts
How Do You Store This Tuna Melt?
Leftovers can be stored in an airtight container in the refrigerator for up to two days. However, it’s best to eat them fresh to maintain that heavenly taste.
If you want to save the filling, keep it separate from the bread, and toast the bread fresh when you’re ready to eat.

Sides for Tuna Melt
1. Crisp Side Salad
A simple green salad topped with a lemon vinaigrette complements the richness of the tuna melt. Use fresh ingredients like spinach, arugula, and cherry tomatoes. The acidity of the dressing cuts through the creaminess, refreshing your palate.
2. Sweet Potato Fries
Crispy baked sweet potato fries make an excellent addition. Their sweetness balances the savory flavors of the melt. Toss them with salt, pepper, and your favorite herbs before roasting for maximum flavor.
3. Pickle Platter
A variety of pickles can brighten the meal. Options like dill pickles, bread-and-butter slices, or sweet gherkins bring crunch and acidity. They harmonize beautifully with the melt.
What Alternatives Can You Use for the Ingredients If They Are Not Present in Your Kitchen?
1. Tuna
If you’re short on tuna, canned chicken or chickpeas can work well. They provide an excellent protein base and can be seasoned similarly.
2. Mayonnaise
Greek yogurt can substitute mayonnaise in a pinch, offering a creaminess with less fat. You can also use avocado for a healthier, creamy option.
3. Bread
In place of sourdough, try whole grain or gluten-free bread. You can even use English muffins for a different twist.
4. Cheddar Cheese
If cheddar isn’t available, use mozzarella or gouda. Both will melt beautifully and provide a different flavor profile to the sandwich.

Tuna Melt Recipe
Equipment
- Medium Bowl
Ingredients
- 2 6-oz. cans tuna in olive oil, drained
- 1/3 cup creamy mayonnaise
- 1 Tbsp. Dijon mustard
- Juice from 1/2 fresh lemon
- 1/2 tsp. red chili flakes
- 1 stalk celery finely chopped
- 2 dill pickles minced
- 1/4 cup finely diced red onion
- 2 Tbsp. fresh parsley chopped
- Sea salt to taste
- Freshly cracked black pepper
- 8 slices of hearty bread such as sourdough
- 4 Tbsp. unsalted butter
- 1 ripe tomato sliced
- 8 slices sharp cheddar cheese
- 1 tbsp. capers chopped
Instructions
Step 1: Prepare the Tuna Mixture
- In a medium bowl, combine the drained tuna, mayonnaise, Dijon mustard, lemon juice, red chili flakes, celery, dill pickles, red onion, and parsley.
- Mix thoroughly until all ingredients are well combined. Taste the mixture and adjust seasoning with salt and pepper.
Step 2: Assemble the Sandwiches
- Lay out half of the bread slices on a clean surface. Spread a generous amount of the tuna mixture on each slice. Top with sliced tomatoes and cheddar cheese. Place the remaining bread slices on top, creating a sandwich.
Step 3: Butter the Bread
- Spread a thin layer of butter on the outside of each sandwich. This will help create that amazing golden crust.
Step 4: Cook the Sandwiches
- Preheat a skillet over medium heat. Once hot, carefully place the sandwiches in the skillet. Cook for about 3-4 minutes on each side, or until the bread is golden brown and the cheese has melted. Adjust heating as necessary to prevent burning.
Step 5: Serve
- Once cooked, remove the sandwiches from the skillet. Let them cool slightly before slicing in half. Serve warm, and enjoy!
Video
Notes
- Experiment with Cheese: Feel free to try other cheeses like Swiss or pepper jack for a twist.Use Fresh Ingredients: Fresh tuna and high-quality mayonnaise will significantly enhance the flavor.
- Add More Veggies: Spinach or arugula can add more nutrition and crunch.
- Spice Control: Adjust chili flakes or use hot sauce for those who prefer it spicier.
- Serving Size: This recipe makes about four sandwiches, a great meal for family or friends.
Nutrition
Frequently Asked Questions
1. Can I make this tuna melt ahead of time?
Yes! You can prepare the tuna filling a day in advance and store it in the fridge. Assemble the sandwiches just before cooking them for the best texture.
2. Can I freeze tuna melts?
Tuna melts do not freeze well once assembled due to the bread texture. However, you can freeze the tuna mixture. Thaw it overnight in the refrigerator before making sandwiches.
3. What’s the best way to reheat a tuna melt?
If you have leftovers, reheat gently in a skillet over low heat. Adding a bit of butter to the pan can help get that crispy exterior back while warming the filling evenly.
4. Are tuna melts healthy?
This recipe is packed with protein and offers healthy fats from tuna and olive oil. Adjust the mayo content for a lighter version or use yogurt instead. Customize with extra veggies for more nutrition.
Conclusion
The tuna melt is not just a sandwich; it’s a nostalgic dish that brings joy to both young and old. It’s versatile, quick to prepare, and perfect for any occasion. With its creamy filling and crispy exterior, this recipe goes beyond the basics, offering a delightful experience.
Whether you’re serving it for lunch or making it a part of a casual dinner, it’s sure to impress. So grab your favorite ingredients, fire up the skillet, and enjoy your very own delicious tuna melt.
You’ll find that this dish can be as creative and unique as you wish! Happy cooking!


