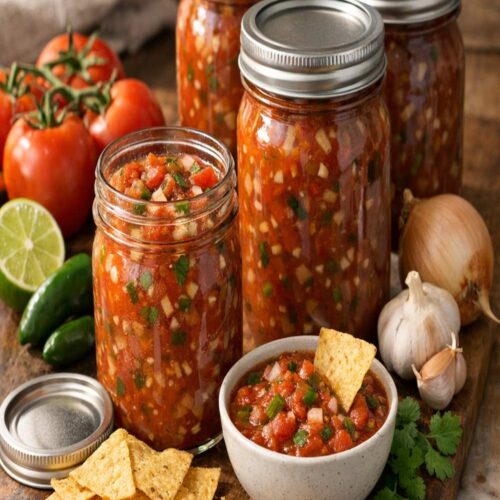
Homemade Salsa To Can Recipe
There's nothing quite like opening a jar of homemade salsa on a winter evening—it tastes like summer in a spoon. This recipe is perfect alongside Authentic Mexican Chicken Taco Recipe or even our American Taco Recipe for a weeknight dinner that feels special. I've been canning this salsa for years, and it's become one of my most-requested gifts.
Ingredients
- 1 12- ounce can tomato paste concentrates flavor and adds body
- 2½ cup white onion finely diced, about 2 medium onions
- 4 medium jalapeños seeded and minced, adjust based on heat preference
- ¼ teaspoon red pepper flakes for subtle heat, adds complexity
- 8 large garlic cloves minced very finely
- ½ teaspoon ground cumin optional but adds authentic warmth
- 1 cup white vinegar 5% acidity for proper preservation
- 6 teaspoon pickling salt kosher salt works if pickling salt isn't available
- 2½ cup green bell peppers finely diced, about 2 large peppers
- 9 cup fresh tomatoes peeled and finely diced, about 12-14 medium Roma tomatoes
Instructions
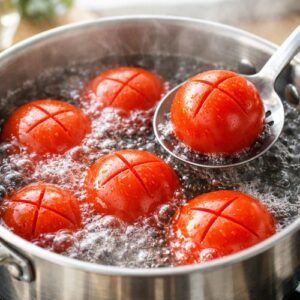
Step 1: Prepare Your Tomatoes
- Start by bringing a large pot of water to a rolling boil. Score the bottom of each tomato with a small X, then carefully place them into the boiling water in batches. You're looking for the skins to begin splitting—this takes about 30 seconds to 1 minute. Remove them with a slotted spoon and place them into an ice bath to stop the cooking. Once cooled, the skins should slip off easily. Discard the skins, then coarsely chop the tomatoes. You should have about 9 cups of chopped tomato. Place them in a large colander over a bowl and let them drain for about 15 minutes—this removes excess liquid and helps your salsa have better texture.
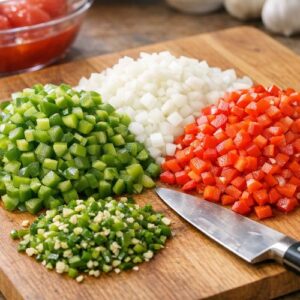
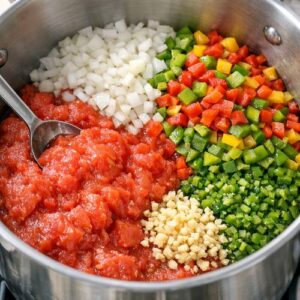
Step 2: Prepare All Vegetables
- While your tomatoes drain, dice your bell peppers and onions into small, consistent pieces—about the size of a pea or slightly larger. Mince your jalapeños very finely, and if you prefer milder salsa, remove the seeds and white membranes where most of the heat lives. Mince your garlic so finely it's almost paste-like; this helps it distribute evenly and prevents large pieces in the finished salsa. Having everything prepped before you start cooking is key. This is what professional cooks call mise en place—everything in its place—and it keeps you calm and organized when you're managing multiple ingredients.
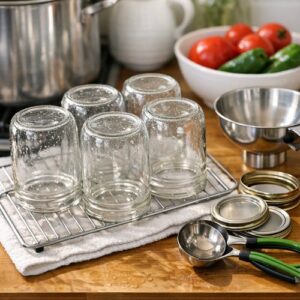
Step 3: Prepare Your Jars and Equipment
- Before you combine anything, prepare your canning jars. Run them through your dishwasher on the hottest setting, or wash them by hand in very hot soapy water and rinse thoroughly. Place them upright on a clean kitchen towel. In a small saucepan, cover your new lids with just-boiled water and let them sit until you're ready to use them—this softens the rubber seal and ensures a tight seal after processing. Fill your water bath canner with enough water to cover jars by about 1 inch and bring it to a simmer. You want it hot but not at a rolling boil yet—you'll bring it to a full boil once your jars are loaded.
Step 4: Combine and Cook the Salsa Base
- In a large, heavy-bottomed pot (at least 8-quart capacity), add your drained tomatoes, diced bell peppers, diced onions, minced jalapeños, minced garlic, tomato paste, white vinegar, and pickling salt. Add the cumin and red pepper flakes if using. Stir everything together over medium-high heat. You're looking for the mixture to come to a gentle simmer. Once it begins to bubble, reduce heat to medium and let it simmer for exactly 15 minutes, stirring occasionally. The salsa should reduce slightly and deepen in color. You're not trying to cook it down significantly—you want to maintain the fresh vegetable texture while ensuring everything is heated through and the flavors meld. Taste and adjust salt if needed. Remember that canned products always taste less seasoned once they cool, so err toward slightly over-seasoned rather than under.
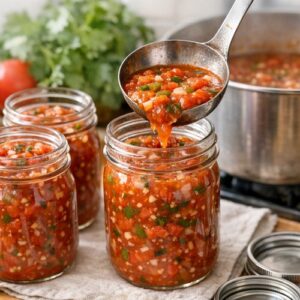
Step 5: Fill Your Jars
- Working quickly, ladle your hot salsa into your prepared jars, leaving ½ inch of headspace at the top. This space is crucial—it allows room for the contents to expand during processing and helps create a proper seal. Use a bubble remover tool (or a clean chopstick) to run around the inside of each jar to remove any trapped air pockets. Wipe the rim of each jar with a clean, damp cloth to remove any drips. Place a hot lid on each jar, then screw the band on finger-tight—firm but not locked down hard. You want the band snug enough that it won't fall off, but not so tight that steam can't escape during processing.
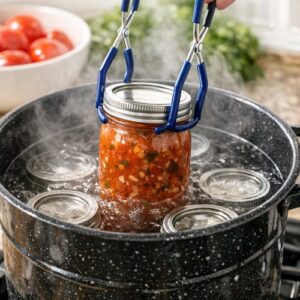
Step 6: Process in Water Bath
- Carefully place your filled jars into your canning pot using a jar lifter, making sure they sit upright and are completely covered by hot water by at least 1 inch. Bring the water to a rolling boil and maintain a steady boil for 15 minutes. (If you're above 1,000 feet elevation, add 1 minute processing time for each 1,000 feet.) The boiling water will bubble vigorously around your jars—this is exactly what you want. The heat penetrates the jars, kills any microorganisms, and causes the lids to seal. After 15 minutes, carefully remove the jars using a jar lifter and place them on a clean kitchen towel to cool completely. Do not tighten the bands or move the jars around while they cool. You should hear a satisfying pop as each jar seals—that's the sound of safety and success. This usually happens within 30 minutes.
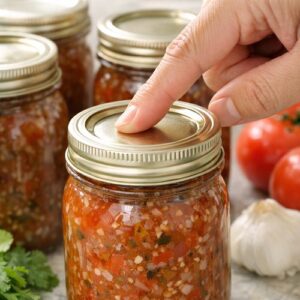
Step 7: Cool and Check Seals
- Once the jars are completely cool (usually after several hours or overnight), check the seals by pressing down on the center of each lid. A properly sealed lid should be concave (dipped down) and shouldn't flex or pop when you press it. If any lids are still popping up, it means they didn't seal—you'll need to either refrigerate those jars and use them within two weeks, or reprocess them with new lids. Remove the bands, wipe the jars clean, and label them with the contents and date. Store in a cool, dark place—your pantry is perfect.
Notes
- Choose the right tomatoes - Roma tomatoes are ideal for canning because they have fewer seeds and less water content than beefsteak varieties. They're also cheaper in season. Look for firm, ripe tomatoes without soft spots.
- Don't skip the tomato paste - This ingredient serves multiple purposes. It adds concentrated tomato flavor, increases acidity slightly for safety, and creates body so your salsa isn't watery. Don't think you can just use more fresh tomatoes as a substitute.
- Invest in proper equipment - A jar lifter prevents burns and broken jars. A bubble remover ensures air pockets don't create weak spots. These tools cost next to nothing but make the process infinitely safer and less stressful.
- Use vinegar at proper acidity - Check your vinegar bottle to ensure it's 5% acidity. This is crucial for safety. Homemade vinegar or vinegar of unknown acidity can compromise the preservation process.
- Keep detailed notes - Write down exactly what you changed (more garlic, less salt, added cilantro) so you can recreate your favorite version next year. Over time, you'll develop your perfect recipe.
- Don't double the recipe in one batch - I know it's tempting, but canning recipes have been tested at specific quantities. Doubling can change cooking time and safety parameters. Make two batches instead.
Nutrition
Calories: 23kcalCarbohydrates: 5gProtein: 1gSodium: 161mgFiber: 1g
Tried this recipe?Let us know how it was!