Elaine Gordon
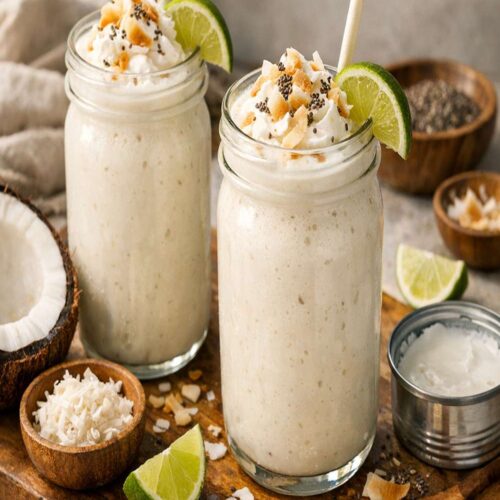
There’s something wonderfully grounding about starting your day with a smoothie that tastes more like a treat than nutrition. This canned coconut milk smoothie pairs beautifully with lighter breakfast options—I often enjoy it alongside fresh fruit or even a simple Aunt Jemima Pancakes Recipe for a more indulgent morning. The creamy coconut base makes it substantial enough to keep you satisfied for hours, which is exactly what my busy clients tell me they need.
My Love Affair with Coconut Smoothies
I’ll never forget the summer my grandmother taught me to crack open fresh coconuts in her kitchen. I was maybe eight years old, standing on a step stool, watching her pour the silky milk into a glass with such reverence. She’d say, “Elaine, this is tropical medicine—nature’s cream.” That moment stuck with me through my entire career as a dietitian.
Years later, when canned coconut milk became a pantry staple, I realized I could recreate that magic any season, any time. But here’s what matters to me now: making sure every smoothie I recommend is nutritionally balanced, truly delicious, and made with real ingredients that my grandmother would recognize. This recipe does all three.
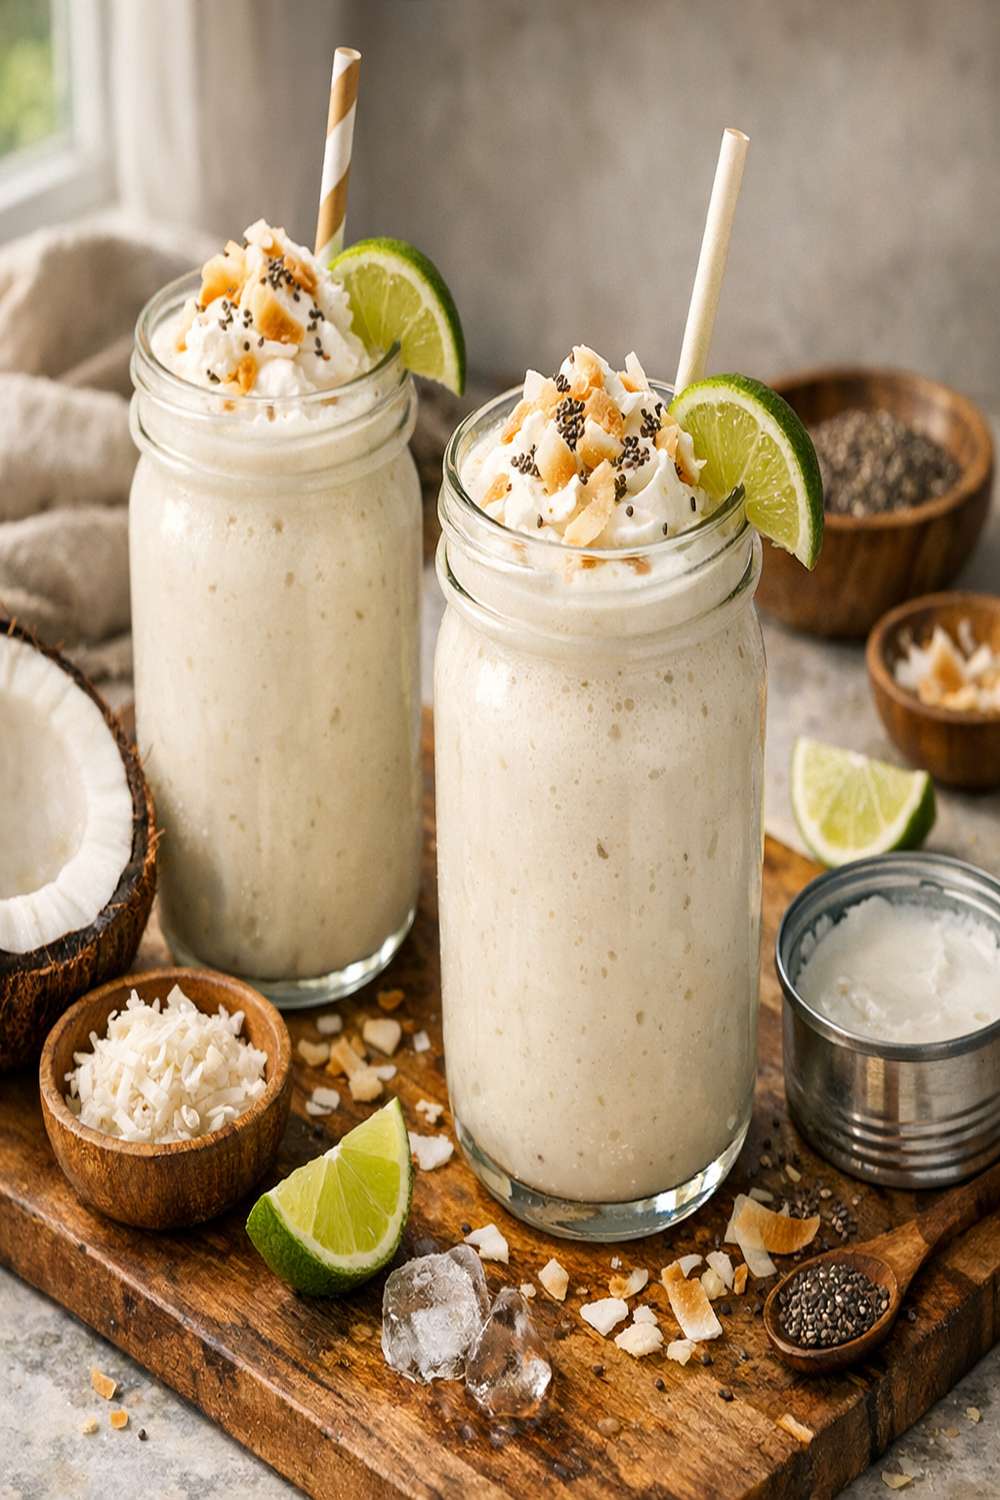
What is Canned Coconut Milk Smoothie Recipe?
This is a silky-smooth, naturally sweet beverage made from quality canned coconut milk blended with fresh coconut chunks, a touch of natural sweetener, and ice. It’s tropical comfort in its simplest form—no complicated techniques, no hidden additives.
The beauty of using canned coconut milk is consistency. Unlike fresh coconut, which varies by season and ripeness, canned coconut milk gives you reliable, creamy results year-round. The coconut chunks add texture and fiber, while the sweetener balances the natural tang you sometimes get from canned products. It’s a drink that tastes indulgent but delivers genuine nutrition.
From a nutritional standpoint, this smoothie provides healthy medium-chain triglycerides (MCTs) from the coconut, which your body can use efficiently for energy. I recommend this especially to clients who need sustained energy without the blood sugar spike that refined sugars can cause.
Why You’ll Love This Canned Coconut Milk Smoothie Recipe
- Ready in under 5 minutes – This is a true weekday breakfast hero. On mornings when I’ve overslept or have back-to-back client calls, this smoothie is my lifeline. No chopping, no cooking, just blending.
- Creamy without dairy – If you’re avoiding dairy or following a plant-based diet, this delivers that luxurious mouthfeel you crave without any animal products. The texture rivals any yogurt-based smoothie.
- Naturally satisfying – The fat content in coconut milk keeps you full longer. I’ve had clients replace their usual mid-morning snack with this single smoothie and report better energy through lunch.
- Shelf-stable ingredients – Everything here keeps beautifully in your pantry or freezer. Perfect for meal prep or those moments when fresh produce seems out of reach.
- Customizable sweetness – Whether you prefer allulose, maple syrup, honey, or even dates, this base adapts beautifully. You control the sweetness level entirely.
- Budget-friendly – Canned coconut milk is remarkably affordable, especially when buying in bulk. Coconut chunks (frozen or dried) are similarly wallet-friendly. You’re getting luxury nutrition without the premium price tag.
The Ingredients
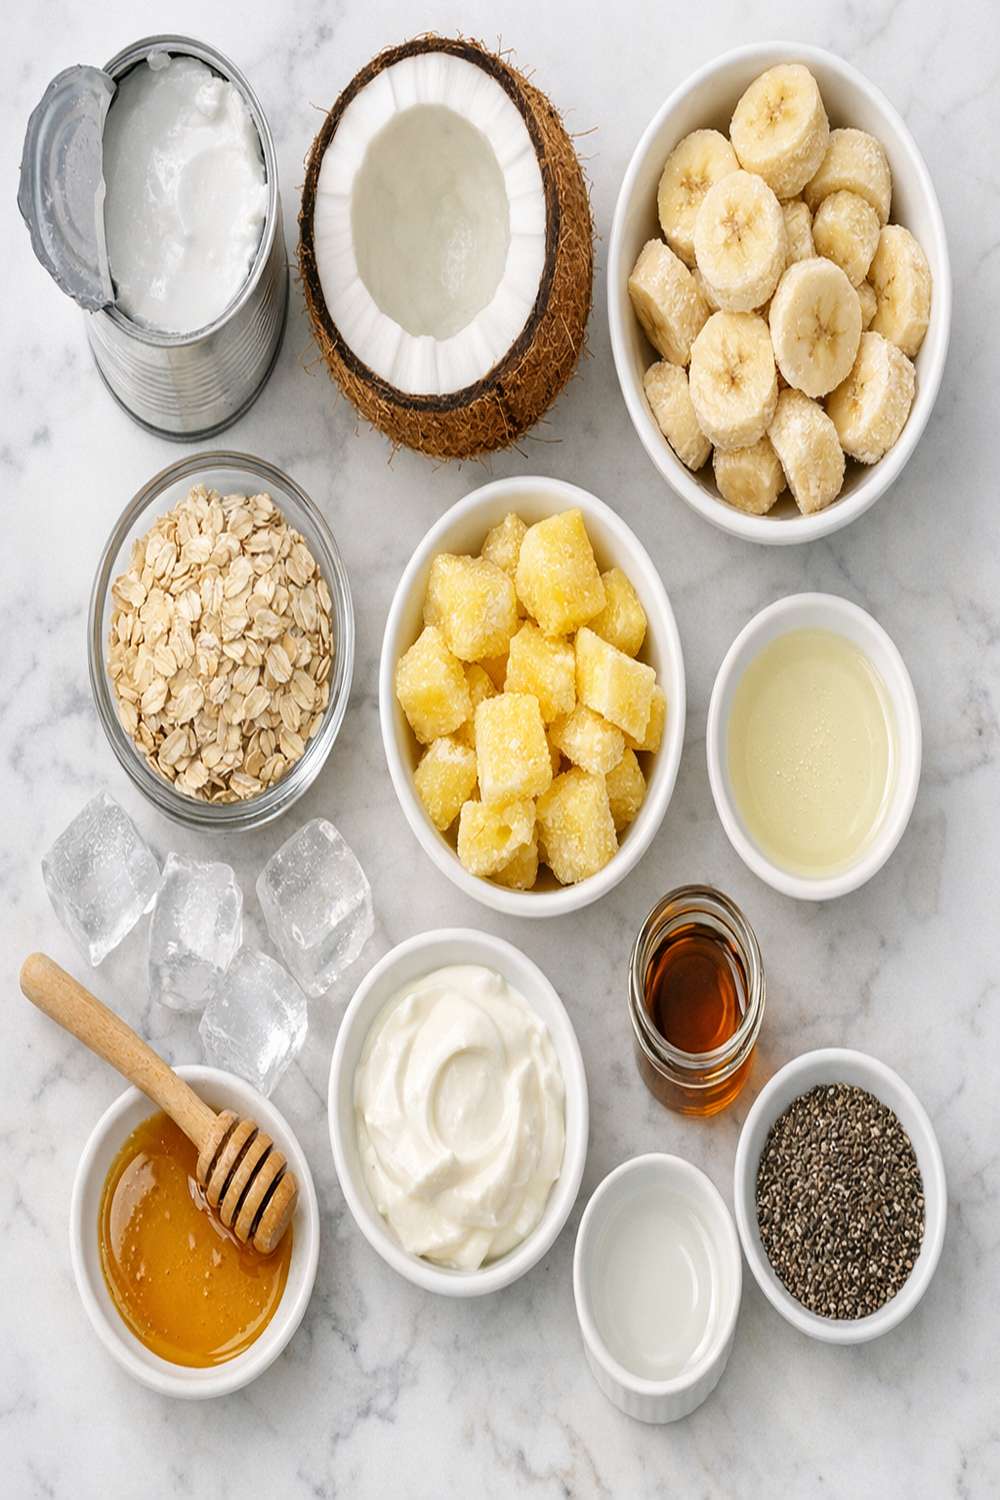
This recipe makes 2 generous servings (about 16 ounces total). Each ingredient here serves a specific purpose—the coconut milk creates creaminess and provides healthy fats, the sweetener brings balance, the coconut chunks add fiber and authentic flavor, and the ice creates that perfect frosty texture. I’ve intentionally kept the ingredient list short because I believe flavor comes from quality, not quantity.
- ½ cup coconut chunks (frozen or fresh, unsweetened)
- 2 tablespoons allulose or other liquid sweetener (maple syrup, honey, or agave work beautifully)
- Pinch of sea salt (brightens coconut flavor without tasting salty)
- 1 cup ice cubes (frozen water or coconut water ice for added flavor)
- 2 cups unsweetened canned coconut milk (full-fat creates the silkiest texture)
- 1 teaspoon pure vanilla extract (optional but transforms the flavor profile)
Expert’s Nutritional Tip: Look for canned coconut milk with minimal ingredients—ideally just coconut and water. Some brands add guar gum or other thickeners, which are fine, but I prefer to achieve thickness through blending technique rather than additives. Also, if your can separates (coconut cream on top, liquid below), that’s normal and actually a sign of pure coconut milk. Just shake or stir before measuring.
How to Make Canned Coconut Milk Smoothie Recipe?
The technique here is straightforward, but a few intentional choices will give you a professional-quality result. I’ve learned through years of testing that the order of blending matters—liquids first, then solids, then ice.
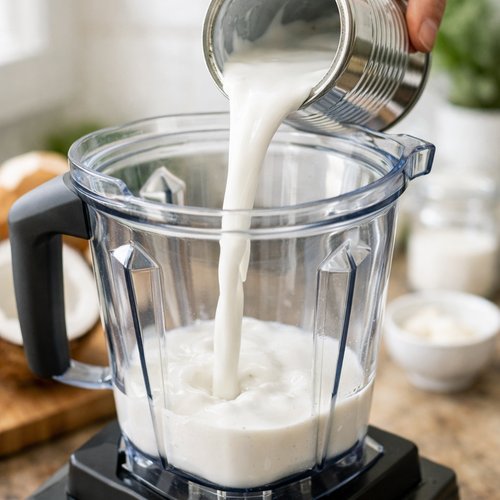
Step 1: Pour the Coconut Milk Into Your Blender
Pour your 2 cups of canned coconut milk directly into a high-powered blender. I prefer to use a countertop blender for this recipe (like a Vitamix or Ninja) because the power matters when you’re working with frozen coconut chunks. The milk should be room temperature or slightly chilled. If you’ve refrigerated your can, that’s fine—just don’t use it straight from the freezer, as this can create an uneven blend.
Step 2: Add Your Sweetener
Add your 2 tablespoons of sweetener directly to the coconut milk. I use allulose frequently because it blends seamlessly and doesn’t have the cooling effect some artificial sweeteners do. If you’re using maple syrup or honey, which are thicker, give them 10-15 seconds of blending on low to start breaking them down. This ensures even sweetness throughout your finished smoothie—no sweet pockets at the bottom.

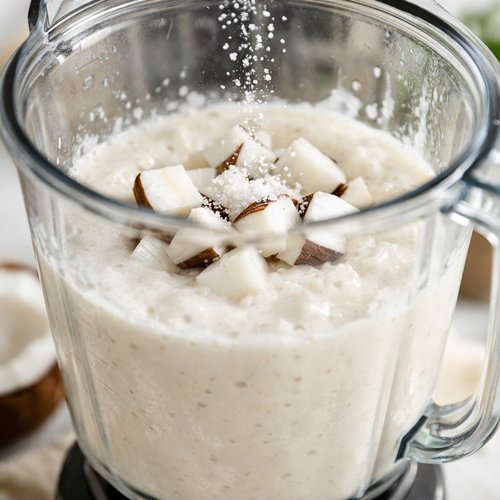
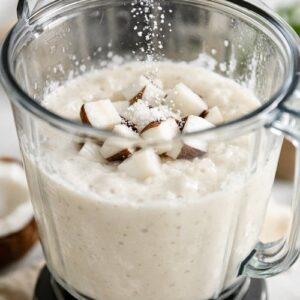
Step 3: Blend in the Coconut Chunks
Add your ½ cup of coconut chunks and vanilla extract (if using) and a small pinch of sea salt. Blend on medium-high speed for 20-30 seconds until you don’t see any large white chunks remaining. At this point, the mixture should look creamy and pale, with a slightly thicker consistency than the original milk. You’re essentially creating a coconut butter base here.
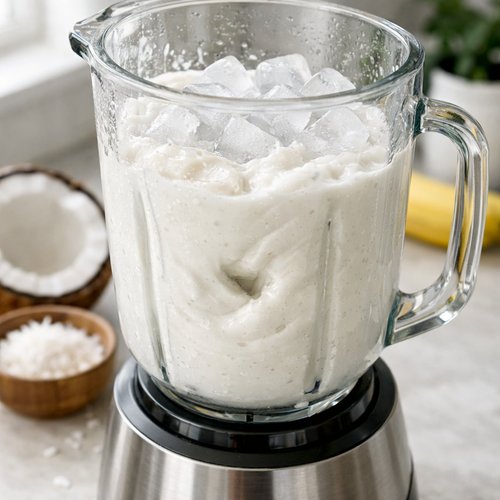
Step 4: Add Ice and Achieve Your Desired Thickness
Now add your 1 cup of ice cubes. Start blending on high speed, and here’s where you have control: blend for 30-45 seconds for a thicker, smoothie-bowl consistency, or 45-60 seconds for a drinkable, pourable texture. If you like it thinner, add more ice. If you want it thicker, add less. Listen for when the blender sounds smooth rather than crunchy—that’s your sign the ice is fully incorporated.
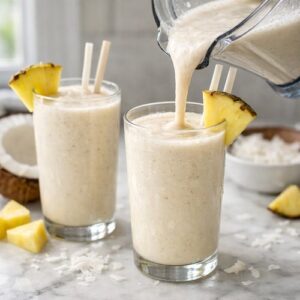
Step 5: Pour and Serve Immediately
Divide between two glasses and serve immediately. This smoothie is best enjoyed fresh. The texture will separate slightly as it sits, which is completely normal—just give it a quick stir if you’re sipping slowly. The coconut and liquid naturally want to separate; that’s the nature of working with whole ingredients rather than stabilizers.

Expert’s Nutritional Tip: Understanding MCTs
As a registered dietitian, I want to clarify something important about coconut milk’s reputation. The medium-chain triglycerides in coconut are metabolized differently than long-chain fats—your liver processes them more readily for energy rather than storage. This is why I recommend this smoothie specifically for morning energy or pre-workout nutrition. Research published by the USDA suggests that MCTs may support metabolic function, but the key is portion control and overall dietary context. One smoothie with 2 tablespoons of sweetener fits beautifully into a balanced diet.
Tips and Tricks
- Make it a protein smoothie – Add 1-2 tablespoons of unsweetened coconut protein powder or vanilla plant-based protein powder without changing anything else. This transforms it into a complete meal that keeps you full for hours. I do this on mornings when I know I won’t have time for lunch.
- Create coconut milk ice cubes – Freeze leftover coconut milk in ice cube trays. Use these instead of regular ice for an even creamier, more intensely flavored smoothie. No dilution from melting ice.
- Batch blend on Sunday – Measure out your coconut milk and sweetener into mason jars (one per smoothie you plan to make). Store in the fridge for up to 4 days. When you’re ready to blend, just add frozen coconut chunks and ice. This is professional meal prep that takes 10 minutes once weekly.
- Use a high-powered blender – Regular blenders struggle with frozen coconut chunks and won’t create that silky texture. If you only have a standard blender, use thawed frozen coconut chunks or fresh coconut instead.
- Temperature matters for blending – Room-temperature liquids blend more efficiently than cold ones. If your coconut milk is very cold, the blades have to work harder and heat builds up, sometimes affecting flavor. Simple solution: let it sit on the counter while you gather other ingredients.
- The pinch of salt is non-negotiable – This isn’t about tasting salty; it’s about brightening coconut flavor. Salt suppresses bitterness and enhances sweetness. Every professional kitchen uses this technique, and it works beautifully here.
Make-Ahead Guide: Meal Prep for Success
I work with many busy professionals, and what I’ve learned is that breakfast planning determines whether people actually eat well. Here’s my tested system for this smoothie:
Sunday Prep (10 minutes): Scoop your ½ cup coconut chunks into a small freezer container. Pour 2 cups canned coconut milk into two separate mason jars or containers. Add 1 tablespoon sweetener to each jar. Label with the date. Store in the refrigerator for up to 4 days.
Freezer-Friendly Option: Pre-portion ice into freezer bags by the cup. Store coconut chunks in a dedicated freezer container. On weekday mornings, grab one bag of ice and one portion of coconut chunks, pour your pre-measured milk mixture into a blender, and blend. Total hands-on time: 3 minutes.
Longer Storage: If you want to prep for two weeks, freeze your coconut chunks in portion bags but keep your milk and sweetener fresh in the fridge. Frozen coconut chunks keep beautifully for up to 3 months without quality loss.
Travel Tip: Blend your smoothie, pour into a glass jar with a tight lid, and refrigerate. It stays fresh for about 4 hours before separation becomes noticeable. Perfect for bringing to the office or on a road trip.
Can I Store Canned Coconut Milk Smoothie Recipe?
The finished smoothie is best consumed immediately or within 30 minutes of blending. After this window, the ice melts and dilutes the flavor, and the ingredients begin separating noticeably.
However, individual components store beautifully. Unopened cans of coconut milk keep in your pantry for 2-3 years. Once opened, transfer any unused coconut milk to an airtight container and refrigerate for up to 7 days. Frozen coconut chunks last up to 3 months in the freezer without flavor degradation. Sweeteners (allulose, honey, maple syrup) are shelf-stable indefinitely.
Make-Ahead Component Storage: Those mason jars I mentioned with pre-measured milk and sweetener? They keep refrigerated for up to 4 days. Store them in the back of your fridge where it’s coldest. On busy mornings, this turns smoothie-making into a true 2-minute operation.
Nutrition Information
Per serving (1 smoothie, serves 2): This smoothie contains approximately 320 calories, 28 grams of fat, 18 grams of carbohydrates, and 3 grams of protein. The fat is predominantly from the coconut milk—specifically, about 50% of those calories come from healthy medium-chain triglycerides.
Based on USDA nutritional databases, two servings of this recipe provide about 95 mg of potassium (important for heart health and muscle function), 15 mg of sodium, and trace amounts of manganese and copper, which support bone health and immune function.
The fiber content is minimal from this base recipe, but here’s where my dietitian brain engages: add 1-2 tablespoons of chia seeds or ground flaxseed (which I discuss in the Substitutes section) to boost fiber to 5-6 grams per serving. This small addition creates a complete nutritional profile that keeps blood sugar stable.
The beauty of this smoothie is its easily customizable macronutrient profile. The 2 tablespoons of sweetener adds about 16 calories and 4 grams of carbohydrates, but you can reduce this if you prefer less sweetness. Allulose specifically has zero glycemic impact, making this smoothie appropriate even for people managing blood sugar carefully.
Common Mistakes to Avoid
- Using sweetened canned coconut milk – Some brands add sugar, which you don’t need. Check your label and choose “unsweetened” explicitly. The difference in taste and nutrition is significant.
- Not shaking your can before measuring – If your canned coconut milk has separated (cream on top, liquid below), you need to shake or stir it first. If you just measure the cream layer, your smoothie will be overly thick and rich. If you measure just the liquid layer, it’ll be thin and watery.
- Skipping the ice or using too little – Ice isn’t just about temperature; it’s about creating the emulsion that makes a smoothie feel creamy rather than heavy. Under-icing results in a drink that feels more like warm pudding.
- Using a underpowered blender – This is the biggest complaint I hear. Regular blenders simply can’t handle frozen coconut chunks effectively. They create chunks rather than smoothness. If you don’t have a high-powered blender, use fresh or thawed coconut chunks instead.
Seasonal Variations
Spring & Summer Version: Keep the base exactly as written but add ½ cup of fresh mango chunks or fresh pineapple (thawed frozen works beautifully too). The tropical fruit pairing feels natural and adds natural enzymes that support digestion.
Fall & Winter Version: Reduce coconut chunks to ¼ cup and add ½ frozen banana plus ¼ teaspoon of ground cinnamon and a small pinch of nutmeg. This version feels more warming and seasonal while maintaining the coconut essence.
Year-Round Protein Boost: Add 1-2 tablespoons of vanilla or coconut-flavored plant-based protein powder to any version without changing other ingredients. This simple addition transforms breakfast into a muscle-supporting meal.
Fiber-Rich Variation: Add 1-2 tablespoons of unsweetened shredded coconut (the ingredient, not the chunks) or 1 tablespoon of chia seeds to increase fiber and create a thicker texture.
What Can I Serve With Canned Coconut Milk Smoothie Recipe?
This smoothie is substantial enough to be a complete breakfast on its own, but I love pairing it with complementary foods that create balanced nutrition. I often serve this alongside toast with almond butter, a small handful of almonds, or fresh berries on the side.
For a more indulgent weekend breakfast, I pair this with my Corn Salsa on crispy toast—the fresh, bright flavors beautifully balance the creamy smoothie. If you’re planning a full breakfast experience, this smoothie pairs wonderfully with savory options like whole-grain toast with avocado or a simple scrambled egg.
- Fresh berries on the side – The tartness of raspberries or blueberries creates beautiful flavor contrast with the sweet creaminess of the smoothie.
- Toasted whole grain bread with almond butter – This adds protein and complex carbohydrates, creating a complete meal that keeps you satisfied for hours.
- A small handful of unsalted nuts – Almonds, macadamias, or cashews add crunch and additional healthy fat and protein.
- Fresh tropical fruit plate – Mango, papaya, or pineapple slices echo the smoothie’s tropical theme while providing fresh enzymes and additional fiber.
- Yogurt parfait on the side – If you eat dairy, a small cup of plain Greek yogurt with granola creates a textural contrast and boosts protein.
Substitutes
- Light coconut milk instead of full-fat – If you’re concerned about fat content, light coconut milk works, but you’ll lose some creaminess. The texture becomes more like a regular fruit smoothie. My recommendation: use full-fat but reduce the amount to 1.5 cups and add ½ cup unsweetened plant-based milk to lighten it while maintaining flavor.
- Frozen banana instead of coconut chunks – One frozen banana (about ½ cup) creates equal creaminess and adds natural sweetness, potentially letting you reduce added sweetener by half. The flavor shifts from purely tropical to creamy tropical.
- Frozen mango or pineapple chunks instead of coconut chunks – This adds sweetness and tropical flavor depth. Start with ¼ cup frozen fruit instead of ½ cup chunks because fruit adds more moisture. You might need to reduce liquid by ¼ cup or add more ice.
- Honey or maple syrup instead of allulose – Both work beautifully and give a different flavor note. Use 2-3 tablespoons of either (they’re thicker than allulose, so measure generously). Maple syrup adds earthy undertones; honey adds floral sweetness.
- Coconut extract instead of vanilla – If you want intensified coconut flavor, use ½ teaspoon of coconut extract instead of vanilla. The flavor becomes more pronounced and authentic.
- Chia seeds or ground flaxseed – Add 1 tablespoon of either to boost fiber and omega-3 fatty acids. Both create a slightly thicker texture and add subtle nutty notes.
- Almond milk or oat milk if avoiding coconut – While this changes the recipe fundamentally, you could replace the coconut milk entirely with 2 cups of unsweetened almond or oat milk and increase the coconut chunks to ¾ cup for flavor. The result is less creamy but more suitable if you have coconut allergies.
Canned Coconut Milk Smoothie Recipe
Ingredients
- ½ cup coconut chunks frozen or fresh, unsweetened
- 2 tablespoon allulose or other liquid sweetener maple syrup, honey, or agave work beautifully
- Pinch of sea salt brightens coconut flavor without tasting salty
- 1 cup ice cubes frozen water or coconut water ice for added flavor
- 2 cup unsweetened canned coconut milk full-fat creates the silkiest texture
- 1 teaspoon pure vanilla extract optional but transforms the flavor profile
Instructions
Step 1: Pour the Coconut Milk Into Your Blender
- Pour your 2 cups of canned coconut milk directly into a high-powered blender. I prefer to use a countertop blender for this recipe (like a Vitamix or Ninja) because the power matters when you’re working with frozen coconut chunks. The milk should be room temperature or slightly chilled. If you’ve refrigerated your can, that’s fine—just don’t use it straight from the freezer, as this can create an uneven blend.

Step 2: Add Your Sweetener
- Add your 2 tablespoons of sweetener directly to the coconut milk. I use allulose frequently because it blends seamlessly and doesn’t have the cooling effect some artificial sweeteners do. If you’re using maple syrup or honey, which are thicker, give them 10-15 seconds of blending on low to start breaking them down. This ensures even sweetness throughout your finished smoothie—no sweet pockets at the bottom.

Step 3: Blend in the Coconut Chunks
- Add your ½ cup of coconut chunks and vanilla extract (if using) and a small pinch of sea salt. Blend on medium-high speed for 20-30 seconds until you don’t see any large white chunks remaining. At this point, the mixture should look creamy and pale, with a slightly thicker consistency than the original milk. You’re essentially creating a coconut butter base here.
Step 4: Add Ice and Achieve Your Desired Thickness
- Now add your 1 cup of ice cubes. Start blending on high speed, and here’s where you have control: blend for 30-45 seconds for a thicker, smoothie-bowl consistency, or 45-60 seconds for a drinkable, pourable texture. If you like it thinner, add more ice. If you want it thicker, add less. Listen for when the blender sounds smooth rather than crunchy—that’s your sign the ice is fully incorporated.

Step 5: Pour and Serve Immediately
- Divide between two glasses and serve immediately. This smoothie is best enjoyed fresh. The texture will separate slightly as it sits, which is completely normal—just give it a quick stir if you’re sipping slowly. The coconut and liquid naturally want to separate; that’s the nature of working with whole ingredients rather than stabilizers.
Notes
FAQs
Can I make this smoothie without a high-powered blender?
Yes, but you’ll need to adjust. Use fresh or thawed frozen coconut chunks instead of frozen ones. Alternatively, substitute the coconut chunks with ½ frozen banana, which a standard blender handles easily. You’ll lose some of the authentic coconut intensity, but the smoothie will still be delicious and creamy. A regular blender works fine once you eliminate the frozen chunks.
Why does my smoothie separate after blending?
This is completely normal and actually a sign you’re using real coconut milk without stabilizers. The fat-rich cream portion and the liquid portion naturally separate as the smoothie sits and cools. Simply give it a quick stir before drinking, or blend it right before serving. Some people actually enjoy this—you get a creamy top layer and a more liquid bottom layer, creating textural variety.
Is this smoothie suitable for people with nut allergies?
Absolutely. Coconut, despite the name, is technically a drupe seed, not a tree nut. Most people with tree nut allergies tolerate coconut beautifully. However, if you have a severe coconut allergy, this recipe isn’t suitable. Always consult your allergist about individual cases. If you’re concerned, a simple substitution would be to use ½ cup frozen banana and unsweetened almond or oat milk for the coconut milk.
Can I use fresh coconut instead of canned coconut milk?
Fresh coconut is challenging for smoothies because you’d need to blend fresh coconut meat with water to create milk, which requires either a very powerful blender or cheesecloth straining. Canned coconut milk is honestly the practical choice for home cooks. That said, fresh coconut chunks (the solid part) can absolutely substitute for frozen ones—just reduce the amount to ¼ cup because fresh coconut is less dense than frozen. You might also want to add an extra ¼ cup of coconut milk to compensate for the loss of texture.
How can I make this smoothie higher in protein for post-workout nutrition?
Add 1-2 tablespoons of vanilla plant-based protein powder or coconut protein powder without changing any other ingredients. This increases protein from about 3 grams to 15-20 grams per serving, making it a legitimate post-workout recovery drink. I recommend this addition specifically for my clients who exercise regularly. The smoothie will be slightly thicker, so you might need an extra 10-15 seconds of blending, but it blends seamlessly. Some people also add 1 tablespoon of unsalted almond or peanut butter for additional protein and sustained energy.
More Recipes You’ll Love
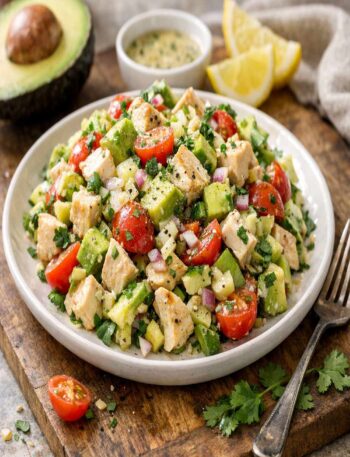
- Avocado Chicken Salad Recipe – A protein-rich lunch that pairs beautifully with this smoothie for a balanced start to your day before heavier meals.
- Corn Salsa – Fresh and bright, this salsa on whole grain toast creates a perfect savory complement to your morning smoothie.
- Instant Pot Butternut Squash – For those days when you want to follow smoothie breakfast with a heartier lunch option.
Final Thoughts
This smoothie represents everything I love about nutrition: simplicity, real ingredients, genuine satisfaction, and the kind of food that makes you feel good both emotionally and physically. It’s my grandmother’s coconut wisdom meeting modern nutrition science. Whether you’re rushing out the door on a weekday morning or savoring a leisurely weekend breakfast, this drink delivers exactly what you need—creamy, tropical comfort that also happens to be genuinely nourishing.
Make it part of your routine, experiment with the seasonal variations, and don’t hesitate to customize based on what your body needs that day. The beauty of a well-designed recipe is that it’s flexible enough to adapt but structured enough to consistently deliver results.
Enjoy your cooking!!